background

Sunday, November 6, 2011

Pumpkin Scones!

I have been on a cooking frenzy, I just love being in my kitchen and created yumminess (Thank goodness for making my butt workout!!, otherwise.....).

Adapted from Sweet Pea.

These pumpkin scones are of course gluten free, but feel free to use whichever flour is best for you and then feel free to thank me for the extreme happiness you will feel when you take a bite :-)!

***There were a couple that had the cream cheese glaze nicely decorated on top, but these things went like wild fire in my house, so when I finally got to take a picture the pretty ones were already gone...but nonetheless here is a visual.


Ingredients for Scones:
  • 2 cups gluten free Bisquick ( or all-purpose wheat flour) 
  • 1/4 cup plus 3 tablespoons granulated sugar (you could probably use Stevia)
  • 1 tablespoon baking powder
  • 1/2 teaspoon salt
  • 1/2 teaspoon ground cinnamon
  • 1/2 teaspoon ground nutmeg
  • 1/4 teaspoon ground cloves
  • 1/4 teaspoon ground ginger
  • 6 tablespoons cold butter, cut into 1-inch cubes ( I used brummel and brown yogurt butter)
  • 1/2 cup canned pumpkin puree (NOT pumpkin pie filling)
  • 3 tablespoons low-fat buttermilk (any milk will work: cow, soy, almond)
  •  1/4 cup of carton egg whites (or 1 egg)
 Ingredients for Cream Cheese Sugar Glaze:
  • 1 cup powdered sugar
  • 2 tablespoons low-fat cream cheese (room temperature)
  • 2 tablespoons milk (again any kind will work)
 Directions:
  1. Preheat the oven to 425 degrees F. Line a baking sheet with parchment paper; set aside.
  2. In a bowl mix together the flour, sugar, baking powder, salt, cinnamon, nutmeg, cloves and ginger ( I just used my whisk..feel free to use a mixer if you like.) Add the pieces of butter and toss with a fork to coat with the flour mixture. Mix until the texture resembles coarse cornmeal, with the butter pieces no larger than small peas.
  3. In a separate bowl, whisk together the pumpkin, milk and egg. Fold wet ingredients into dry ingredients, and form the dough into a ball (I used my hands...wayyy more efficient.) Pat out a ball of dough onto a lightly floured surface and form into a make-shift square. Use a knife to slice the dough diagonally. Cut each of the squares to create a triangular shape. I ended up with 10 scones, but you could easily have 12 or more if you would like them smaller. Place on prepared baking sheet. Bake for 14-16 minutes, or until light brown.
  4. While the scones are cooling, make the powdered sugar glaze by mixing the powdered sugar, cream cheese and milk together until smooth. When scones are still slightly warm, drizzle the glaze over the top of each scone. Allow to firm, about 30-45 minutes...or as long as you can resist.


A crowded drop of BLOOD...A Quick Flasback

A week or so ago the Prince said he wanted to learn about the body again. We explored his suggestions and narrowed it to blood. The Prince is fascinated with the body and for a while now he has known the various parts of blood, however he continues to be fascinated with exploring it and of course you know what that does to this mommy/teacher...yep, it makes me smile.

Here are a couple of projects we completed:

First we read a little book on the parts of blood, the I drew and cut and the Prince colored and pasted. VIOLA!


After we completed this the Prince said, "That's not what I was talking about?" I was confused and replied "I thought you wanted to make a drop of blood?" He said "Yes, but for real not on paper."

YIKES...I was stumped, so quickly I came up with a really basic idea of how he might get a visual of a red blood cell in plasma and this is what I initially came up with....red food coloring dropped into oil.


The Prince thought that was really cool, BUT THEN...I found something WAYYY better on Pinterest! Check this out...


Ingredients: empty container with a lid, 1/2 c. corn syrup (plasma), 1/2 c. red hots (red blood cells), 1 tbls lentils (platelets), 5 dry lima beans (white blood cells).


MIX!


And this is what a drop of blood under a microscope looks like! I think this is so super cool, even if that makes me a dork ;-)!


*****Angela’s blog, Satori Smiles, has beautiful photographs of this experiment.

Thursday, November 3, 2011

The Sharp Academy daily lesson samples

I have been ask by homeschoolers and non-homeschoolers what our daily activities look like on a typical day, so I decided to share what each day looked like this week. I have to say that writing the daily lessons, in order, on the white board is 100% the Prince's idea. He asked for the lessons to be listed where he could see what needed to be completed for the day and so he could mark them off as we completed them. I secretly think he was catching on to me adding lessons to the day if we finished early, but I admit that this method has been the easiest and most efficient of all. KUDOS to my precious Prince.

On with the pics:


So there you have it. How do you present your daily lessons?

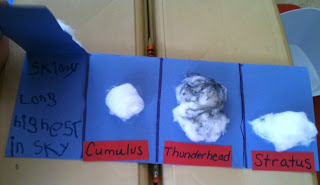
Clouds: Big and Puffy or Long and Wispy...Clouds

This week one of our many fun and educational lessons focused on Clouds. First, I must thank my inspirational blogger, Cara! Honestly, I recreated the the same lessons she did with her students and it was a blast! So let the pictures and descriptions begin:


I recreated Cara's poster introducing four separate cloud types and practicing adjectives to describe clouds!


The next day we began by reading the non-fiction book, Clouds by Ann and Jim Merk and then I introduced the "cloud people" that I created to help reinforce each cloud's features. Of course, this too is from Cara.


After being introduced to our classroom cloud people, we created our own cloud foldable book.


We then moved onto two fiction books; Little Cloud by Eric Carle and It Looked Like Split Milk by Charles Shaw. These cute books led use right into the Prince creating his own puffy cloud, in the shape of his choice, with a mixture of Elmer's Glue and Shaving Cream! The Prince then had to write about his created cloud shape.


The Prince wrote, "My cloud is a mud puddle. I made it because I like to jump in mud puddles." He really enjoyed his cloud that dried into a soft puffy "cloud."

Throughout the week, the Prince looked up at the sky and identified the clouds....this momma/teacher was a happy girl!

2 Digit Subtraction Without Regrouping FREEBIES

I am falling, quickly, quickly in love with Mrs. Lemons and her second grade blog. She always has such great activities and they are always sooo cute! So here is here recent post 2-digit subtraction activities without regrouping with a little addition thrown in. Here blog is a great find, you should really go check her out!


Click {HERE} for an "I Spy" activity (pictured below)


Click {HERE} for addition/subtraction sort (pictured below) in COLOR

Click {HERE} for addition/subtraction sort in BLACK AND WHITE


Click {HERE} for Match it (pictured below)!  in COLOR

Click {HERE} for Match it! in BLACK AND WHITE


Step into 2nd Grade with Mrs. Lemons: 2 Digit Subtraction Without Regrouping FREEBIES: Click here to see original post of the creative Mrs. Lemons.

Wednesday, November 2, 2011

UPDATED - Free Pearson Online Science and Math


The Prince really enjoys this science curriculum. I use it in conjunction with library books, home experiments and the science interests and exploration of the Prince.   We tend to do more hands-on Math , so we haven't really used the Math curriculum.

Welcome to Pearson Online Free Curriculum

Scott Foresman Science

I have to say the with regards to these science links Grade 1 and 5 are far superior, if I can find better versions of the other grades I will immediately update this post.
Scott Foresman Math

Tuesday, November 1, 2011

Gluten Free Cornmeal Bundt Cake with Orange Yogurt Glaze


I made this on Halloween and this is what hubby and I enjoyed while the Prince munched on candy. I was such a happy girl! This is softly sweet cake with a slight cornbread texture; once you drizzle with the super yummy orange glaze on top you too will be a very happy girl/guy. Try it, you will be very glad you did.
Adapted from Sandra Lee

Ingredients

Bundt Cake
  • Nonstick cooking spray
  • 2 cups Gluten Free Bisquick 
  • 1 cup Red Bob Mill's Cornbread mix 
  • 2 teaspoons baking powder
  • 1/2 teaspoon baking soda
  • 1/4 teaspoon salt
  • 1 cup non-fat vanilla greek yogurt
  • 1 1/4 cups packed brown sugar
  • 3/4 cup canola oil
  • 3/4 cup of liquid egg whites 
  • Juice from one large orange (I used a navel orange)
  • 1/2 cup water 
Glaze
  • 1 cup non-fat vanilla greek yogurt
  • zest from 1 orange (zest prior to squeezing)
  • 1 cup powdered sugar

Directions

Preheat the oven to 350. Spray a standard size Bundt pan with nonstick cooking spray.

In a large bowl, whisk together the Bisquick, cornbread mix, baking powder, baking soda and salt.

In a small bowl, whisk together 1 cup yogurt, brown sugar, oil, eggs and orange juice until completely combined. Stir the wet ingredients into the dry just until incorporated. Pour into prepared the pan and bake until it is puffed and golden and a tester placed in the center comes out clean, 35 to 40 minutes. Remove from the oven, and when cool enough to handle, invert onto a wire cooling rack. Cool completely before slicing.
For the topping, stir together the remaining 1 cup yogurt, orange zest and powdered sugar. Slice the cake and serve with the yogurt topping drizzled over top.

**This could easily be adjusted to be dairy free or you could use wheat product.***

Who am I kidding? The Prince did most of the work, as he does with most things in our kitchen!

Popsicle Stick Math

At The Sharp Academy, we are always looking for interactive, fun, cost-efficient and educational ways to learn. Additionally, we are not big worksheet peeps; Here is one idea that we are currently using for addition and subtraction.

Materials

Large Popsicle Sticks (from Dollar Tree)
Black Sharpe
Cups/containers (I used the ones from our science kit, but you can get a pack of cups from the Dollar Tree)
Plastic Baggy (to store supplies)


I labeled the popsicle sticks with the addition and subtraction facts of the number I printed on the cups.

I decided to use tape, so I can easily change the number when we begin another set of numbers.


We typically have three aids to assist in our math computation, one is always mental math and in this picture we also had our abacus (Marshall's $9.99) and foam blocks (my newest find from the Dollar Tree!)


When the Prince enjoys lessons, I am a happy mommy/teacher!


****I should mention that for school supplies, I LOVE the Dollar Tree.